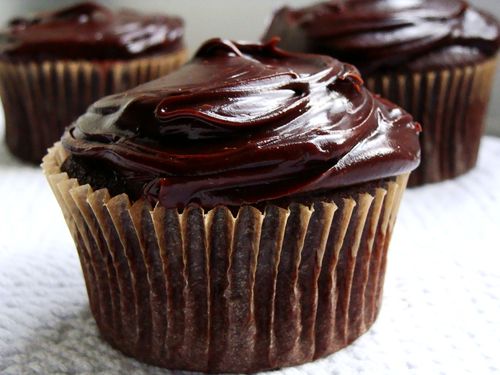
devil’s food cupcakes + rich chocolate frosting
Since I consider honesty one of my strong suits, I must confess I’m eating one of these cupcakes while I write this post. I needed sustenance to get through a late night of playing catch up after the school chancellor declared a snow day. I love my girls, and while I more often than not try to stop and smell the roses, next week is winter break. Needless to say I’m starting the month on a deficit when it comes to available work time.
These cupcakes have super powers. I’m convinced of that, so please don’t burst my bubble. I can’t help but smile while licking the rich, creamy frosting from my teeth after taking a bite. Yes, I like to lick the smudge of frosting off my fingers too. Oh dear, I can only imagine the spam that last sentence will illicit.
But, back to the cupcakes. I didn’t research the origins of naming a cake devil’s food, but I’m guessing it has something to do with the irresistible taste. I know a thing or two about both baking and eating this type of cake. In fact, I’m an expert on finding the best in New York City—outside of my own kitchen now that is. I remember telling my girlfriend my weight gain was the equivalent to eating our then four-year old daughters back when I was pregnant with IRP eight years ago, with a raging chocolate cake craving.
These cupcakes are also very accommodating, and stay fresh stored on a cake stand loosely covered with plastic wrap. I happen to be sitting right next to said cake stand, and since will power doesn’t rank up there with honesty in strong suits, I’m eating ate one. I keep adding extra push ups and crunches to my workout routine…once I get started again. The current count must be four-digits by now.
Oh, yes the cupcakes. Well, I’m sure you heard about them if you follow me on twitter or are a fan on Facebook. My mission began two weeks ago when the Mr. told me he wanted a ring ding inspired cake for his recent birthday celebration. I made three cakes in four days. Then decided to make another one and these cupcakes a few days ago, after his birthday. Call it good measure. Or maybe it was a premonition of the impending snow day. They made the girls very happy, especially the ones with sprinkles. This glaze topping reminds of the same cupcake they used to make at my favorite neighborhood bakery that closed six years ago *sniff*. They used to sell them for only 30 cents—35 if you wanted them with a creamy center.

I had intended to post my recipe for scones this week but then realized Valentine’s Day was coming up this weekend, and what better way to say I love you than with a homemade chocolate treat. No candy thermometer needed. Leave the chocolate tempering for another day. This weekend, bake up some of these devilishly intense tokens of your affection. There’s no doubt the recipe came from the heart. And when you’re done, keep the recipe in an easy to reach place because there’s no doubt you’ll want to bake, and eat them, over, and over, and over again.
Before we get to the good stuff, a few more things you need to know. For starters, I hadn’t intended this post to be a novel. It’s just that I wanted to share some very helpful tips, so here it goes. I promise your attention will be well rewarded.
You won’t find any melted chocolate in this recipe. By trial and error, I came to the conclusion that it makes for a more dense cake, and I wanted a light, heavenly crumb (funny, considering I’m doing the devil’s work). Not to say there was anything wrong with those test cakes. In fact, they were quite delicious and I will share them sometime soon. I was also aiming for a moist cake, and while many recipes use canola or vegetable oil for that purpose, I like to be buttered up, so relying solely on cocoa was a much better fit.
I really think the type of cocoa powder you use makes all the difference in the end result too. I love Scharffen Berger, and used the semi-sweet baking bars for the ganache, but for the cake, only Valrhona will do for me. You’ll know what I’m talking about the moment you open a pack of it.
And, in case you’re wondering, yes this recipe is also perfect for making a layer cake. Sadly, my photos didn’t come out that great, so none to share…for now at least. Use my green baking tip and grease your cake pans with the empty butter wrapper and be sure to “flour” them with cocoa powder, to maintain the beautiful deep, dark color of your cakes. In fact, file this factoid away for any chocolate cakes you bake. And, that paper you see in the bottom of the pan is simply a circle I cut from a sheet of parchment paper (adhered after the bottom of the pan was buttered). You can also buy pre-cut circles too, so do put some sort of parchment to save any heartache when releasing your cake from the pan.

I could’ve been a bit neater considering how much Valrhona costs.
If there’s one other important bit of advice I can give when making cakes, please do be sure to cream your butter and sugar really well. A friend was over while I was preparing the cakes for the big birthday party and she asked about overbeating cake batter. This was probably prompted by my nonchalant approach to letting the stand mixer whirl away for oh, say five minutes. I can see how that might be alarming. See, overbeating really only becomes an issue once the flour is introduced to the batter. That’s when you have to treat the gluten gently to ensure a tender crumb.

well-creamed butter and sugar
The same can be said about beating in the eggs. Frankly, I skip the “beat in one at a time” copy you see in most recipes because really it’s just more important to make sure they are well beaten and incorporated into the batter. Go ahead, add all three eggs at once, and then crank the mixer up to medium-high until the batter-in-progress is past the point of looking curdled and has become a smooth, fluffy consistency.

the eggs have been well-beaten too
Flour. I can devote a whole post to this alone. After initial tests with all-purpose (APF), I can say you must, must use cake flour for this recipe. While APF works well for muffins, golden cakes and even other chocolate cakes, it was King Arthur’s Unbleached Cake Flour that made this one so light. Brooklyn folks, I was lucky enough to stumble across it while shopping at Union Market.
Is there anything else I’m forgetting? Oh, yes the frosting. This is really a ganache inspired one, and it’s a little different from my recipe for hot chocolate. Many ganache recipes call for simply whisking hot cream into chopped chocolate. I prefer a not too sweet cake, hence less sugar than in most recipes, but when it comes to a fudgy frosting. Oh, baby, bring it on. So I added sugar to my recipe. Feel free to leave it out if you like a more intense chocolate experience, and for that matter you can even swap in bittersweet chocolate for the semi-sweet. And that creamy looking tuft of marshmallow filling you see below? Well, that’ll have to wait for another post. It’s well worth the foreplay. Happy Valentine’s Day.

This recipe is now available to paid subscribers on my site, Simmering. Join thousands of other subscribers now for only $5/month or $30/year (that’s six months free!). Use this link for a special 15% discount on annual subscriptions for being a loyal reader of In Jennie’s Kitchen (that’s only $25.50/year!).

Kris
Those look fantastic. I just finished making Snickerdoodles and now I’m totally craving creamy, rich chocolate. Thanks a lot!! LOL 🙂
Fuji Mama
Mmmmm, you are my kind of woman! I love things that aren’t super sweet, and the darker the chocolate the better! Can’t wait to try this out!
Naomi
Winter break next week! Wahooo! Sorry, excuse my glee, I’m a teacher and we feel differently about these things.
Maybe I’ll try making these cupcakes in all my spare time.
Bethany
These look great! I was just extolling the virtues of using cocoa instead of tempered chocolate when I made some brownies the other day — since then, I’ve made a cake and cookies using cocoa and I think I’m falling in love!
Michele
I wish I had some of that Valhrona chocolate. I want to make these tonight! It will have to wait since I only have Hershey’s cocoa powder and that won’t do. I wish I didn’t see this tonight because thinking about them is going to keep me up all night!
Michelle
Your pictures are beautiful! These cupcakes look so divine, I’m going buy the ingredients for this delectable cake and make it for my little Valentines!
Debi (Table Talk)
I have dessert covered for Valentine’s day, but my daughter’s B-day is right around the corner and she will love these!
KellyW
Am I missing the temperature? It is probably right in front of me.
Jennifer(Savor)
ohh….you did get the post up-i say you enter into #foodislove. Off to dry my drool
Memoria
You definitely know what you’re talking about. I, too, cream the butter and sugar(s) together while I assemble the dry ingredients. I believe in mixing the ingredients before introducing flour as well. The stand mixer really helps a baker do that without many problems.
Your cupcakes look fantastic. Thanks for reminding me that we can freeze cupcakes. As a single person, I have to reject the strong urge to make cakes because I’m afraid I’ll either eat them all or they will go bad after a couple of days. Great photos!
Jen @ My Kitchen Addiction
These cupcakes look absolutely divine! I’ll be giving them a try very, very soon! Love the photos, too!
Natalie
Those look awesome! So Chocolatey!
Emily
I saw the cupcakes on foodgawker.com and must say, not only are you a talented food photographer, but your blog is quite lovely. Thanks for sharing this recipe and your photos!
🙂
-Emily
Linda Billingsley
Can the chocolate be in a bar form or chip form?