baking basics + pumpkin buttercream
Since next week marks the start of a very busy baking season, I thought it would be helpful to share some tips I've found useful over the years. When you're done reading, I highly recommend these pumpkin cupcakes with pumpkin buttercream frosting. I first made them last Halloween and it took me a whole year to set out and recreate them.
The initial recipe was a homerun—the lightest, most tender crumb, and while I was winging it, I did record the ingredients and directions. The reason I held onto it for so long is I'd initially made them with my beloved White Lily flour. I just assumed I'd never be able to reproduce the exact texture with regular Northern civilian flour.
To that I can now say phooey! Even veteran bakers have their doubts, but thankfully I didn't let it stop me from creating one of the best pumpkin cupcakes I've ever tasted. In fact, I didn't even need to tweak any ratios or methods. I just swapped in good old King Arthur all purpose flour.
Softened Butter
A properly softened stick of butter should be pliable, meaning you can bend it slightly, without being mushy. This is especially important when making cookies. If the butter is too soft, they'll likely spread too much during the baking process.
You can speed up softening by simply cutting whatever amount you need into small pieces, and set them on a dish while you prep the rest of your ingredients.
Room Temperature Eggs
While the length of time varies depending on how hot or cold your kitchen is, generally 20 to 30 minutes is enough to bring eggs to the correct temperature. If you forget, or decide to bake spur of the moment, add the uncracked eggs to a bowl filled with warm (not hot) water for about 10 minutes.
Why bother? For cookies, you won't notice a huge difference, but for a tender, light cake, this is one step you don't want to skip. Adding cold eggs to the creamed mixture can result in a curdled batter.
Melting Chocolate
Unless you're tempering chocolate, that whole double boiler method just adds time and an extra pot to the dishload. Even famed pastry chef Claudia Fleming used a microwave to melt chocolate on occassion. Just be careful since it quickly goes from melted to burned. My 1000 watt oven melts a few ounces in 60 to 75 seconds. Do a few tests in your own microwave, then make note of the magic timing. Another bonus is microwave heated foods also lose their heat quickly, so it won't take as long for the chocolate to cool before adding it to your batter.
How to Freeze Cookie Dough
Place premeasured dough onto a parchment or wax paper lined baking sheet and freeze until the balls of dough are just set. Remove from the sheet and store in a ziptop bag, removing as much air as possible to avoid freezer burn. This is the same way to prepare cookie dough for making homemade cookie dough ice cream. It's also a lifesaver for unexpected company, last-minute party invitiations and if you forget the kids' holiday school party.
Mise en Place
Who the what? This is chef tech-talk, simply a French term for setting up your ingredients before starting your baking adventure. Restaurants have a team of cooks devoted to this. Home cooks are on their own. When I'm in recipe development mode, I never set up mise en place (though I do record every step, so I can reference it for future tests). When I'm straight up baking for the pure pleasure, I sometimes do set it up, especially if it's a new recipe that I've never used.
- Pro—you don't have to worry about forgetting to add an ingredient, which has happened to all of us, right?
- Con—it means more dishes, and they are my mortal enemy.
- My solution—One short cut is to use one dish to hold large ingredients like chocolate chips and chopped nuts. Read the recipe carefully, and if the dry ingredients are whisked together, as in many baked goods, you can just measure them into one bowl and you'll be ready when that step comes. Setting up a mise en place is also a good way to get a jump start on breakfast, whether it's a busy morning or you're hosting a brunch. Set out your measured non-perishable ingredients the night before, and the morning will seem less daunting.
- My shortcut—if you do prefer setting up your mise en place, get the butter and sugar creaming first, if it's a recipe that calls for this step. Then you can use that time more efficiently to set out the remaining ingredients. And when setting up your mise, measure dry ingredients first so you can stick to one set of measuring spoons. It's those little things that make me feel victorious come clean up time.
Silicon Liner vs. Parchment
I posed this question to my twitter pals last week, and us bakers have definitive thoughts on this one. One thing I'm in agreement on, parchment is king when it comes to cookies. I must admit, though that for the volume I bake, I use silicon liners. I just don't feel comfortable using all that parchment paper.
When it comes to candy making, the liners are preferred by most people. The bigger issue with silicon liners are the cost. Most people replied they love them but only have one due to the hefty price tag. Amazon has the best prices—they're currently only $12 to $16 depending on what size you need and also eligible for free Super Saver Shipping. Buy the 11X16 or 11X8 mats through this link and it's a win-win for us both!
But what aboutBPA, you're wondering, right? No one wants to put anything potentially harmful into their food, and currently there is no evidence to support any leaching from these silicon mats. This article by Marye Audet, whom I highly trust and respect, has more information.
To Sift or Not to Sift
I never do it. Really, and Gail has an excellent post detailing this, so I'm not going to say another word on the subject. I know you're wondering about Confectioner's sugar, because every frosting recipe calls for it to be sifted. Nope, I don't sift that either. I find a whisk and deep bowl is all you need to remove any lumps.
For you high-altitude folks, this post fron Barbara at Vino Luci is a must bookmark page. And lastly, these are just a few tricks up my apron. Please share your tried and true tips for making this a fun and easy baking season for all!
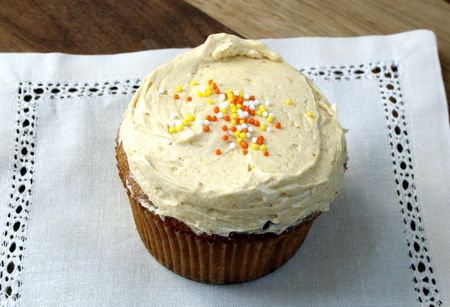
pumpkin buttercream frosting
makes about 3 cups
While I won't judge if you eat this frosting by itself, it really does go great with these pumpkin cupcakes on my Cuisinart blog. I know I've been adding weights to my recipes, but for some reason didn't record it on this one. I figured you'd want me to share it regardless, lest it take a whole year for me to make them again!
2 sticks (8 ounces) butter, softened
1/2 cup pumpkin puree
1 teaspoon pure vanilla extract
1 to 2 cups Confectioner's sugar
Beat the butter in the bowl of stand mixer fitted with a paddle attachment until creamy. Add the pumpkin and vanilla extract; beat until well combined. With your mixer on low speed, add the Confectioner's sugar in thirds. Once incorporated, bring the mixer speed up to medium-high and beat well after each addition. Once all of the sugar has been added, beat frosting on high speed for 2 minutes. May be stored in an air-tight container in a very cool, dry place for up to two days.
Lauren @ Healthy Delicious
I’ve neen craving cake lately (odd craving for me) and the thought of pumpkin buttercream just set it off again. Yum! And great tips! I’m glad to know I’m not the only one who doesnt bother sifting.
Kate @ Savour Fare
I have a few tips — when you’re baking cookies, you can reuse parchment paper for multiple batches.
I use the microwave to soften butter (one stick, 3-5 seconds on all four sides, turn in between stages)
I also use the microwave to melt chocolate (I start with 30 seconds, then stir, then microwave for 10 second intervals, stirring between each interval. The stirring is key — it helps distribute heat and breaks surface tension if you’re using something like chocolate chips)
If the wet ingredients are all added together in stages (like they are in a lot of cakes), I usually mix them in a pyrex measuring cup (fewer dishes)
Joan Nova
Very timely…I just published a post asking my readers for baking advice. This helps
Elizabeth
I was just thinking about pumpkin butter cream last night before drifting off to sleep. By this morning I had completely forgotten to look online for a good recipe. So glad that you posted this so I can whip up a batch of cupcakes for our friends’ Pre-Thanksgiving feast next week!
Jennie
Kate, great tips, especially on using the same glass to mix the “wet” ingredients. I do that all the time too.
Joan, my dear auntie who inspired my love of baking is named Joan, so you just must get in there this holiday season. Glad the tips helped.
Elizabeth, be careful with the frosting—it’s addictively good. And so easy, you can almost do it with your eyes closed.
Jen @ She said. She said.
Great post and wonderful reminders. I’m glad I’m not the only non-sifter out there.
Silpat is on my Christmas list!